
Questionnaires can be scheduled from either the Questionnaire tab of a record, or from the Search Questionnaire Templates page.
To schedule, a questionnaire from a record go to your chosen record and open the Questionnaire tab.
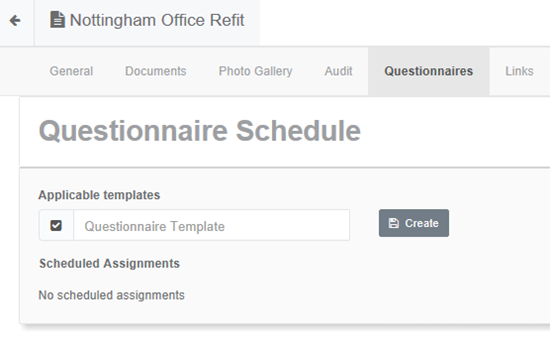
Click on the Applicable Templates field and begin to type in the name of the questionnaire you wish to assign; this will generate a list of questionnaire templates relevant to your search criteria. Select the questionnaire template that you wish to use and click Create; this will open the box shown below.
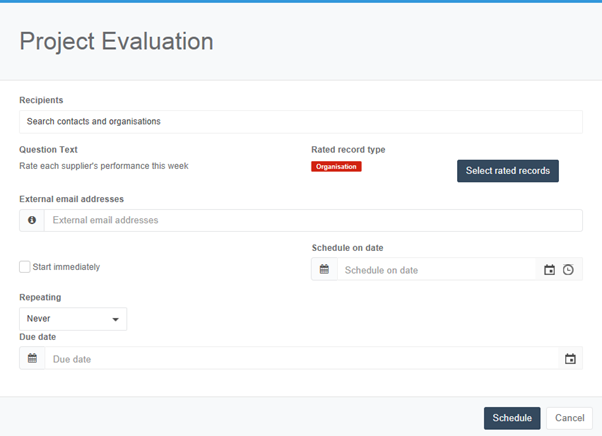
Questionnaires can be assigned to either an internal contact, an organisation, or an external email address.
- To assign a questionnaire to an internal contact begin to type in the contact’s name under Recipients; a list containing contacts relevant to your search criteria will be generated. Selecting a contact will add them to the list of recipients; to delete a contact from the list click the red cross next to their name. After scheduling this questionnaire the contact will receive a notification informing them that they have a questionnaire to complete.
- To assign a questionnaire to an organisation search for the organisation’s name and add them to the list of Recipients. After scheduling this questionnaire a link will be sent to the email address listed on the Organisation Record; clicking on this link will open the questionnaire in an external part of the site allowing the assignee to complete the questionnaire without needing access to the system.
- To assign a questionnaire to an external email address simply type the email address into the relevant field; multiple email addresses can be added by separating them with a semi-colon. After scheduling this questionnaire a link will be sent to the email; clicking on this link will open the questionnaire in an external part of the site allowing the assignee to complete the questionnaire without needing access to the system.
If the questionnaire template contains a contextual question, it is at this point that you will be able to select the records that you wish to rate; the scheduling box will populate a list of questions that use the contextual question type and allow you to specify different records for each question. To select the records you wish to rate click on the  button; this will populate a list of related records that are linked to the record that the questionnaire is about. In the example above the questionnaire is designed to evaluate a project, the rating question is asking you to rate suppliers working on the project and so when clicking on ‘Select rated records’ a list of all suppliers working on the project will be populated. Use the check boxes to select the records and then click ‘Save’; when the questionnaire is scheduled a separate question for each rated record will be generated. For more information on this function see Completing Questionnaires.
Questionnaires can be scheduled to begin immediately by clicking the check box for ‘Start Immediately’, or they can be scheduled to be issued on a specific date. To schedule a questionnaire on a specific date click on the  button and select a date; they can also be issued at a specific time by clicking the
  button and selecting a time, without selecting a time the questionnaire will be issued at midnight on the chosen date by default.
If you need to schedule questionnaires on a regular basis it can be useful to use the Repeating function; clicking on this will open a drop-down menu allowing you to choose a time frame for how often the questionnaire should be scheduled. Each option will generate a different set of criteria allowing you to specify the exact occurrence of the questionnaire; for example, selecting the ‘Weekly’ option will generate the criteria shown below.
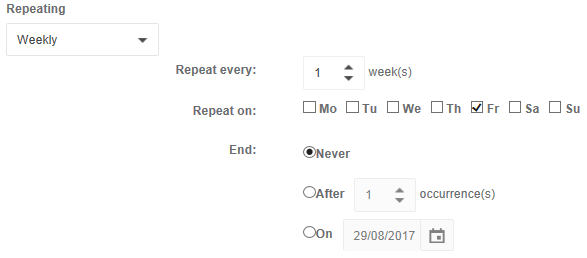
If the questionnaire has only one scheduled occurrence you will have the option to select a due date, click on the button and select your desired due date. If the questionnaire is assigned to internal contacts then this due date is optional, however if it is assigned using an external link then the due date is mandatory as this will expire the link on the chosen date.
If the questionnaire is scheduled to repeat you will have the option to specify a time frame in which the questionnaire must be completed; for example if the questionnaire is scheduled on a monthly basis you may wish to give the assignee 3 days to fill in the questionnaire before it becomes overdue.
Once you have filled in the required details click ‘Schedule’ to schedule the questionnaire, or click ‘Cancel’ to return to the Questionnaire tab of the record.
Search Assignments
Search Assignments allows you to view all of your questionnaire assignments in one place; clicking on this option will open the page shown below. The questionnaires are ordered from 'Active' with the nearest due date to 'Inactive' with furthest due date. Active questionnaires consist of those that are Assigned, Overdue, Submitted and Rejected questionnaires; Inactive questionnaires consist of those that are Accepted or Closed. This means that when you open the Search Assignments page you will be presented with the questionnaires that most require your attention.
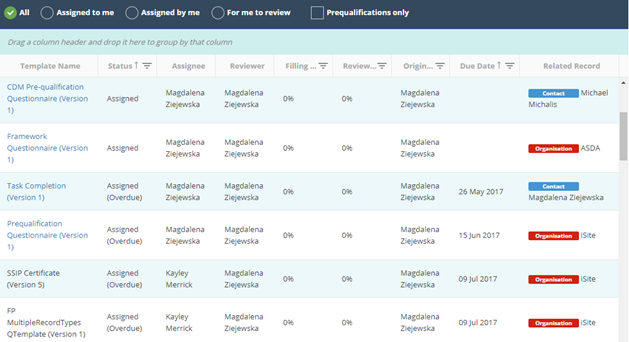
The page is separated into four tabs: All, Assigned to me, Assigned by me, For me to review.
- All – this tab displays all questionnaires that you are linked to.
- Assigned to me – this tab displays questionnaires that you are required to complete.
- Assigned by me – this tab displays questionnaires that you scheduled.
- For me to review – this tab displays questionnaires that you are required to review.
Additionally there is the option to view Prequalification only assignments; this will filter your assignments to show only questionnaires associated with the prequalification process. For more information on this function, see Prequalification and Supply Chain.
The list of questionnaire assignments contains the following information:
- Template Name
- Status
- Assignee
- Reviewer
- Filling Progress – percentage of the questionnaire that has been completed
- Review Progress – percentage of the questionnaire that has been reviewed
- Originator
- Due Date
- Related Record
To open an assignment simply click on the link under Template Name.
Search Questionnaire Assignments
To search for questionnaire assignments click the  button next to the column header. For example, if you wanted to search by Due Date you could click the button next to Due Date.
For more information on this function see Filters.
Sort Questionnaire Templates
You can also sort items by grouping them; to do this drag the column header that you wish to group by into the blue box above the columns. This will sort the questionnaire templates into groups defined by the column header; in the example shown below the questionnaire assignments have been grouped by Status.
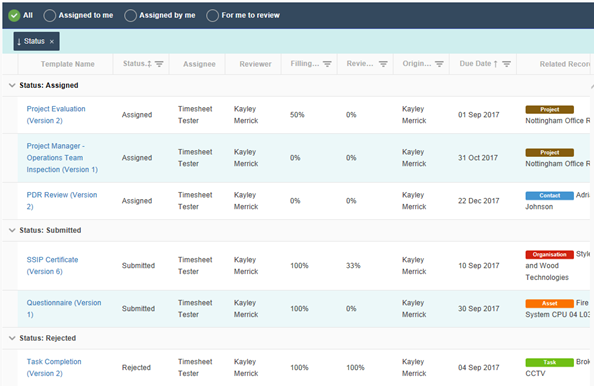
To change the order that the questionnaire assignments are displayed in click the column header that you wish to organise by. Clicking once will arrange them in alphabetical order defined by the information in that column. Clicking the column header for a second time will arrange the questionnaire assignments in reverse alphabetical order. Clicking the column header for a third time will return the questionnaire assignment to displaying in the original order.
Custom Filters
Custom Filters allow you to conduct a more detailed search of the questionnaire assignments; these are expandable & collapsible using the filter symbol . For more information on this function see Custom Filters.
Completing Questionnaires
To open a questionnaire assignment simply click on a link from the Search Assignments page, or from the record that the questionnaire is about. You will only be able to open questionnaires that you have been assigned to, or completed questionnaires that you are required to review.
An example questionnaire containing all question types is shown below.
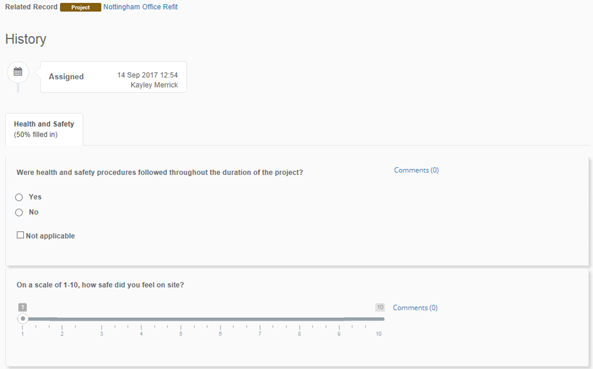
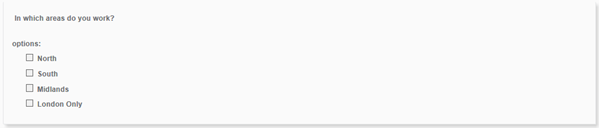
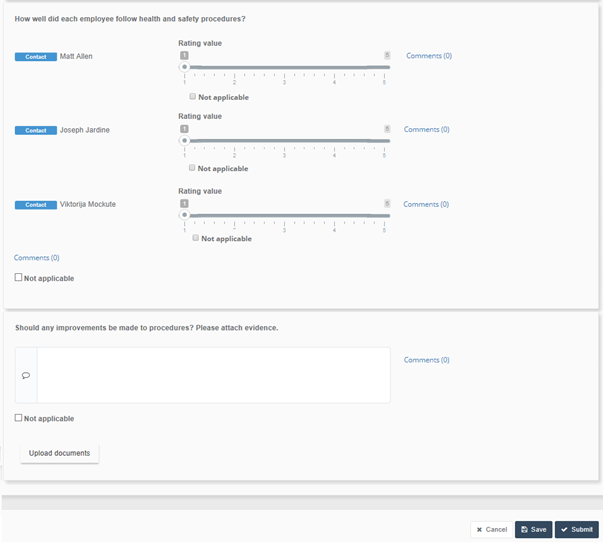
As you start to answer the questions you will notice that the % filled in for each tab starts to increase, this feature helps you to keep track of how much of the questionnaire you have completed. You will not be able to submit the questionnaire until each tab has been fully completed.
Next to each question you will have the option to add comments; all comments are recorded with a date and time stamp next to the name of the user who made the comment. Each question will also have a check box next to it for ‘Not Applicable’; if this option is chosen then the question will be greyed out and you will not have to answer it before completing the form, if this question uses scoring then it will not be included as part of the overall questionnaire score. This check box may not always appear, if the person who created the questionnaire marked this question as ‘Always applicable’ then you will have to provide an answer to the question before you can submit the form. If you are answering a contextual question you will have an option to select Not Applicable and provide a comment next to each contextual record (such as contact or organisation).
If a question requires you to upload a document you can do so by clicking on 'Upload documents' underneath the question you are answering; this will open a link to your PC where you will be able to select documents to upload. Multiple documents can be uploaded at once either by selecting multiple from your document list, or by uploading one document and then clicking on the 'Upload documents' button again to upload further documents. If a document has been added by mistake you can remove it by clicking the cross next to the appropriate document.
There are three buttons at the bottom of the questionnaire: Cancel, Save, and Submit.

Clicking ‘Cancel’ will return you to the Search Assignments page, any progress that has been made on the questionnaire will not be saved. If you cannot complete the questionnaire is one sitting you can save your progress by clicking the ‘Save’ button. When you are ready to submit your questionnaire click ‘Submit’; this will notify the reviewer that you have completed your questionnaire and it is ready for review. If the questionnaire template is updated or obsoleted after it has been assigned to you, you will still be able to complete the current version as only future versions of the questionnaire will contain any changes.
Reviewing Questionnaires
When a questionnaire is ready for review the reviewer will be able to open the questionnaire and view the responses, an example questionnaire in review is shown below.
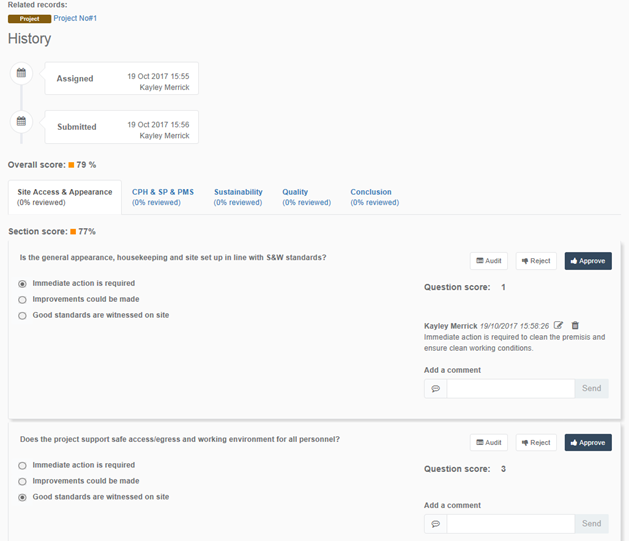
From here the reviewer will be able to see the overall questionnaire score as well as each section score and individual question scores; where Contextual Questions have been used you will be able to view the score of each record against the individual record rather than the question as a whole. If any RAGs have been set up this is where you will be able to view them.You will also be able to see a history of the questionnaire assignment such as when it was first scheduled, when the assignee submitted the questionnaire and each stage of the review process. Each question can be individually Approved or Rejected; if a question is rejected you will be asked to provide a rejection reason.
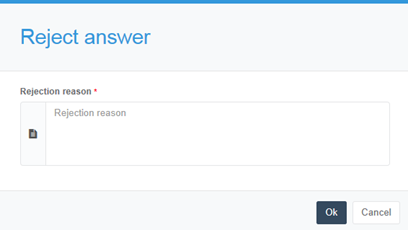
Fill in a reason and click ‘Ok’ to reject the question; this will mark the question as rejected and will save your rejection reason as a comment next to the question. If a question is rejected then you will not be able to Accept the questionnaire as a whole. Clicking ‘Cancel’ will return you to the questionnaire without rejecting the question.
As you review each question you will notice that the % reviewed for each section increases; although it is not mandatory to review each question individually this function can help you keep track of how much of the questionnaire you have reviewed.
As well as add rejection comments next to a question you can also add regular comments simply by typing in your comment and clicking 'Send'; this will add the comment next to a question. As a reviewer you will be able to edit and delete comments by clicking on the  and
and  buttons respectively. Each question is audited and you can view this by clicking on the 'Audit' button next to the question. The audit will detail the answers that have been provided as well as any changes made to these questions, it will also detail all comments that have been added to the question including rejection reasons.
At the bottom of the page there are four options: Back, Reject and Close, Reject, and Accept

Clicking ‘Back’ will return you to the Search Assignments page, any progress you have made in reviewing the questionnaire will be saved. ‘Accept’ will accept the questionnaire and prevent changes being made to it. ‘Reject and Close’ will reject the questionnaire but will not request more information from the assignee. ‘Reject’ will reject the questionnaire and inform the assignee that more information is required.
Upon rejection of the questionnaire you will be asked to provide an optional rejection reason; when the assignee is notified that the questionnaire they submitted has been rejected, the notification will contain this text providing them with an overall reason why the questionnaire was rejected.
When the assignee opens the questionnaire they will be provided with a summary at the top of their questionnaire, an example is shown below.
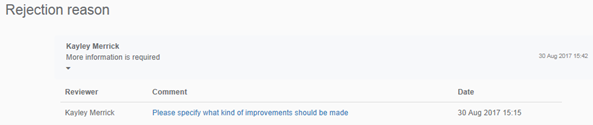
The summary displays the overall rejection reason as well as any specific questions that have been rejected; clicking on the rejection comment will take you directly to that question. You can change you answer for rejected questions and questions that have not been reviewed, but you will not be able to change your answers for questions that have been accepted. Accepted questions are marked with a symbol.
Once any changes have been made you will be able to save or submit the questionnaire for second review, the reviewer will then be able to accept or reject the questionnaire as appropriate. There is no limit to the number of times that this process can be followed; each time both assignees and reviewers will be notified of status updates, comments can be made throughout the process and will be recorded with the name of the user and the date on which it was made.
Search Questionnaire Templates
Search Questionnaire Templates allows you to search for any questionnaire template within the system, filter through questionnaire templates, and schedule questionnaire assignments. Clicking on this option will open the page shown below.
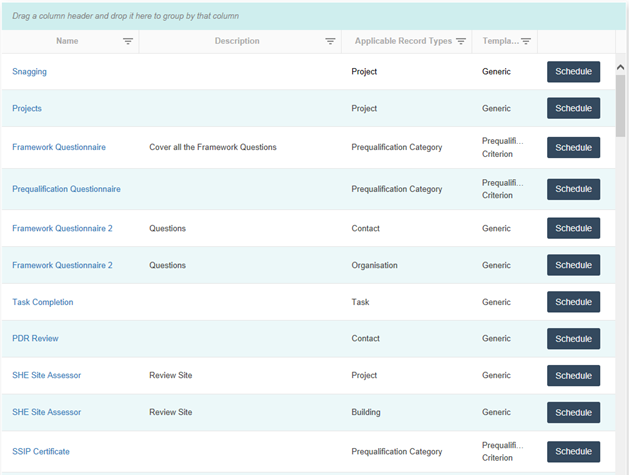
The list of questionnaire templates contains the following information:
- Name
- Description
- Applicable Record Types
- Template Type
To open a Questionnaire Template Record simply click on the name of the questionnaire.
Search Questionnaire Templates
To search for questionnaire templates click the button next to the column header. For example, if you wanted to search by Name you could click the button next to Name.
For more information on this function see Filters.
Sort Questionnaire Templates
You can also sort items by grouping them; to do this drag the column header that you wish to group by into the blue box above the columns. This will sort the questionnaire templates into groups defined by the column header; in the example shown below the questionnaire templates have been grouped by Name.
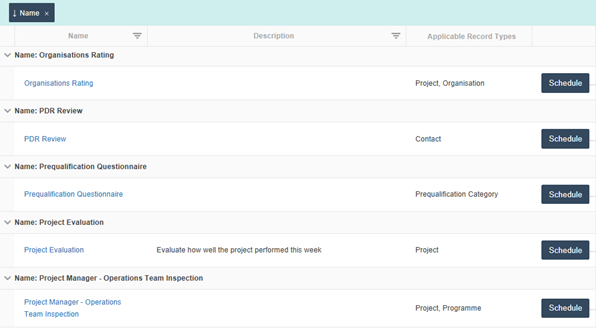
To change the order that the questionnaire templates are displayed in click the column header that you wish to organise by. Clicking once will arrange them in alphabetical order defined by the information in that column. Clicking the column header for a second time will arrange the questionnaire templates in reverse alphabetical order. Clicking the column header for a third time will return the questionnaire templates to displaying in the original order.
Custom Filters
Custom Filters allow you to conduct a more detailed search of the questionnaire templates; these are expandable & collapsible using the filter symbol .For more information on this function see Custom Filters.
Schedule Questionnaire Assignments
To schedule a questionnaire assignment from the search page click on the  button next to your chosen questionnaire; this will open the popup shown below.
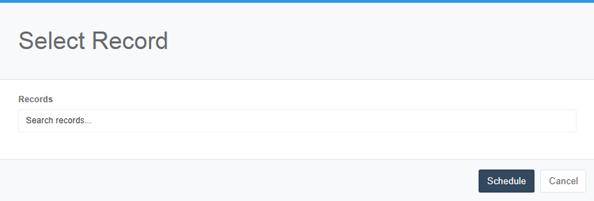
Because questionnaires are stored against a specific record, when scheduling questionnaires from the search page you must first select relevant records for the questionnaire assignment to be stored against. To search for a record begin to type the first few letters of the name into the Search Records bar; this will generate a dropdown list of records relevant to your search criteria. The search will only return record types that have been specified in the Applicable Record Types.
Once you have selected the records that you wish to schedule the questionnaire against click ‘Schedule’; for more information on this function see Scheduling Questionnaires. Alternatively you can click ‘Cancel’ to return to the Search Questionnaire Templates page without scheduling a questionnaire.
Set up Prequalification Questionnaires
How to Set Up Prequalification Questionnaires
Prequalification Questionnaires (PQQs)
Prequalification Questionnaires are used to ensure that suppliers meet a specified standard before allowing them to work on you projects.
Creating a PQQ
To create a PQQ you will need to navigate to Tools > Questionnaires > Create Questionnaire Template from the main menu. This will open the page shown below.
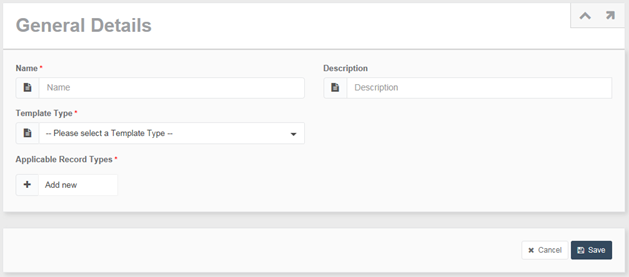
From here you will be able to give your questionnaire a name and add a description. To ensure that the questionnaire is linked to PQQs you must select 'Prequalification Criterion' from the Template Type dropdown menu, and select Prequalification Category for the Applicable Record Type. Once you have completed these fields the page will expand to allow you to input the questionnaire details.
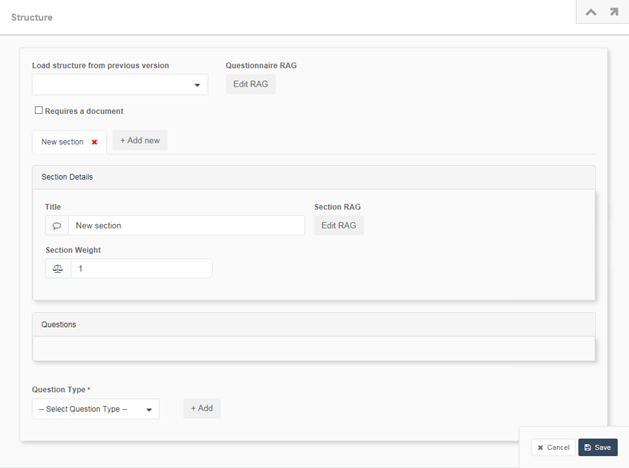
For help on how to complete the Structure section of the questionnaire see Create & Edit Questionnaire. Note that contextual questions cannot be included in PQQs.
Linking PQQs to Categories
After creating your PQQs you will need to link them to a prequalification category. Prequalification categories are used so that multiples questionnaires can be issued to an organisation at the same time; this allows you to keep track of and manage all PQQs for an organisation in one location.
For help on creating Categories see Create Categories.
Scheduling and Completing PQQs
For help on scheduling and accepting PQQs see Prequalification.
For help on completing PQQs see Completing Questionnaires.
Set up Supplier Performance Questionnaires
How to Set Up Supplier Performance Questionnaires
Supplier Performance Questionnaires (SPQs)
Supplier Performance Questionnaires are used to measure how well suppliers are performing across your projects and programmes.
Creating an SPQ
To create an SPQ you will need to navigate to Tools > Questionnaires > Create Questionnaire Template from the main menu. This will open the page shown below.
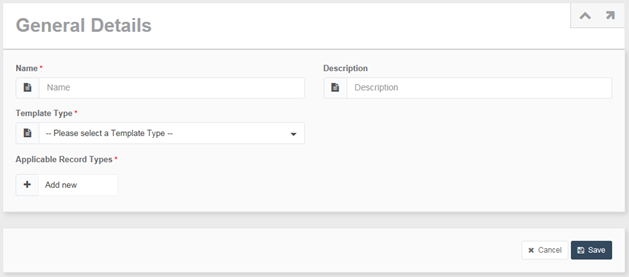
From here you will be able to give your questionnaire a name and add a description. To ensure that the questionnaire is linked to SPQs you must select 'Supplier Performance Questionnaire' from the Template Type dropdown menu, and select Programme for the Applicable Record Type. Once you have completed these fields the page will expand to allow you to input the questionnaire details.
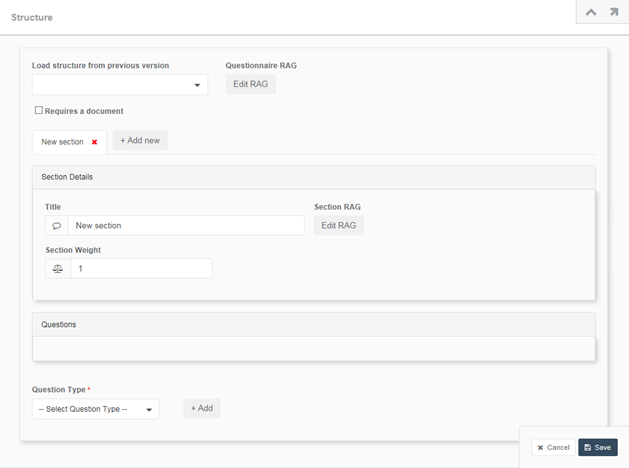
For help on how to complete the Structure section of the questionnaire see Create & Edit Questionnaire. It is advisable to use Contextual questions when creating SPQs as this allows you to use one basic questionnaire template and apply it to multiple records, rather than creating questions specifically about each supplier that you wish to rate.
Setting up an Organisation
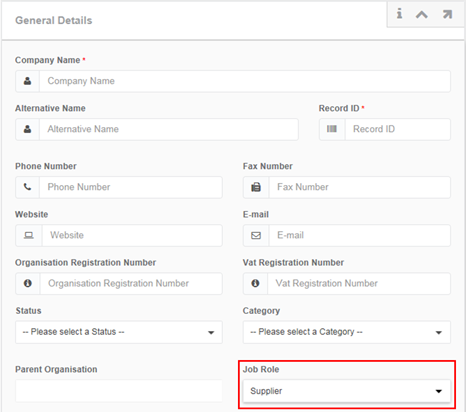
After creating your SPQ Template you will need to make sure that your Organisations are set up correctly so that they can be linked to projects. On the Create Organisation form there is a field for Job Role, ensure that this is populated with the appropriate option for the organisation.
Setting up a Project
Following this you will need to make sure that the project is set up correctly so that the list of suppliers can be populated, and the SPQ sent to the correct users.
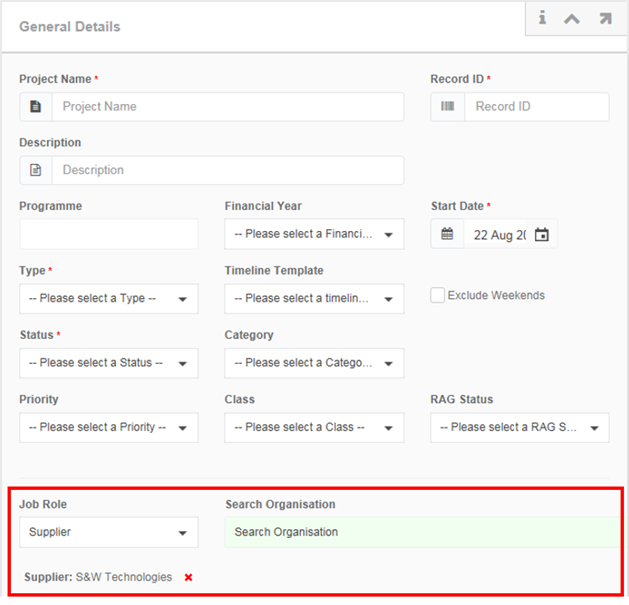
Whilst creating a Project record you have the option to link organisations as suppliers. Under Job Role select the appropriate organisation job role and then use the search field to find the organisation. Note that the search field will only populate organisations that have been labelled with appropriate Job Role as described in the above section. Once you have added all of the required suppliers, complete the project creation page as usual; for help creating a project see Project Create.
After creating your project you will need to navigate to the project timeline and add resources to your events. When scheduling SPQs the questionnaire will be assigned to the contact for the selected job role on each project so it is important to ensure that the appropriate job roles and resources have been added to your timeline. For help on creating timelines see Timeline.